

Protecting Wheelchair During Air Travel: 9-Step Guide
Table of Contents
- What You'll Need Before You Fly
- Step 1: Disassemble and Protect Sensitive Parts
- Step 2: How to Request Airport Wheelchair Assistance
- Step 3: Understand the TSA Wheelchair Screening Process
- Step 4: Preparing Power Wheelchair for Flight
- Step 5: Gate Check vs. Cargo Hold: Which Is Safer?
- Step 6: Document Everything Before Handoff
- Step 7: Know Your Airline Wheelchair Damage Compensation Rights
- Frequently Asked Questions
Last Updated: September 5, 2026
Protecting wheelchair during air travel is a common concern for mobility device users, and for good reason: ground handlers move thousands of chairs daily, and damage reports are far too frequent. The difference between a smooth trip and a disaster often comes down to preparation hours before you reach the airport. This guide covers a complete nine-step process covering disassembly, documentation, and knowing your rights under the Air Carrier Access Act (ACAA).
The single most important mindset shift is this: your wheelchair is not luggage, it is an assistive device, and the law treats it differently. The U.S. Department of Transportation rules on wheelchairs require airlines to return your chair in the same condition it was received. But relying on that protection after the fact is far worse than preventing damage in the first place.
What You'll Need Before You Fly
Gather your protective supplies at least a week before departure: bubble wrap or foam padding, zip ties, a roll of stretch wrap, scissors, a permanent marker, and your phone for photos. Many travelers also keep a small repair kit with hex wrenches and spare bolts.
A hard-shell case or padded wheelchair travel bag is the single best investment for protecting wheelchair during air travel, ranging from soft padded covers for manual chairs to rigid cases for power models. If a case is not in your budget, wrap sensitive areas in bubble wrap, secure with zip ties, and cover the chair with a moving blanket.
Step 1: Disassemble and Protect Sensitive Parts
Start by removing everything that can detach: seat cushions, footrests, armrests, and the joystick controller. Wrap each piece individually and pack in your carry-on whenever possible. Seat cushions are especially vulnerable, and losing one makes the chair unusable until a replacement arrives.
The joystick controller is the most fragile component on a power wheelchair. Remove it entirely if the design allows, wrap it in several layers of bubble wrap, and carry it with you in the cabin. For manual chairs, fold the frame and secure any loose parts with zip ties so nothing rattles loose during handling.
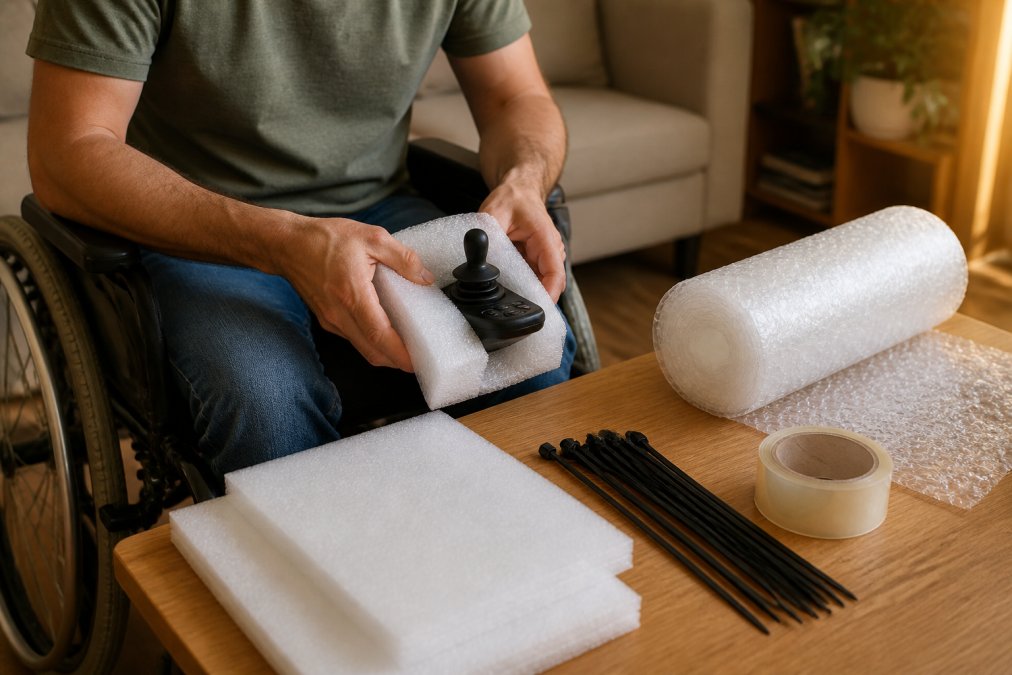
Side guards and anti-tippers are often bent during transit because they protrude from the frame. Remove anti-tippers and pack them separately. For side guards that cannot be removed, add an extra layer of cardboard or foam directly over them before wrapping the frame.
Step 2: How to Request Airport Wheelchair Assistance
Requesting airport wheelchair assistance is a separate process from protecting your own chair, and you should do both. When you book your flight, call the airline's disability desk directly rather than the general booking line to ensure your needs are noted and a boarding chair is available at the gate.
You do not need to prove your disability to request assistance. The ACAA requires airlines to provide help to anyone who self-identifies as needing it. When you arrive at the airport, check in at the ticket counter and remind the agent that you require a boarding chair and assistance to your gate.
Step 3: Understand the TSA Wheelchair Screening Process
The TSA wheelchair screening process is designed to inspect your chair without you having to leave it. You remain seated in your own wheelchair through the security checkpoint, and a TSA officer performs a pat-down screening while another officer inspects the chair. You have the right to request a private screening area and to have a companion present.
During the TSA wheelchair screening process, officers will wipe down the joystick, armrests, and wheels to test for explosive residue. They may also ask you to transfer to a stationary chair if a more thorough inspection is needed. Ask for a boarding chair or a transfer chair before you stand, and never feel rushed to move faster than is safe for you.
The TSA guidance for passengers with disabilities recommends arriving at the checkpoint with your chair's battery type clearly labeled, especially for power wheelchairs with lithium-ion batteries. This labeling speeds up screening and reduces the chance of confusion.
Step 4: Preparing Power Wheelchair for Flight
Preparing power wheelchair for flight requires attention to the battery system, since airline rules differ based on battery type. Dry cell batteries and sealed wet cell batteries are generally allowed in the cargo hold without special packaging. Non-spillable wet cell batteries must be disconnected and terminals insulated to prevent short circuits.
Lithium-ion batteries follow stricter rules. Most airlines require the battery to be removed and carried in the cabin if it exceeds a certain watt-hour rating, though some smaller batteries can remain installed if the chair is designed for it. Check with your airline well before departure, as policies vary and approval may need to be documented at check-in.
Step 5: Gate Check vs. Cargo Hold: Which Is Safer?
Gate checking is almost always the safer option for protecting wheelchair during air travel, but the decision isn't always yours to make. Here's how each path works, plus a decision framework.
The Gate Check Process in Detail
When you gate check, you retain control of your chair until you're at the aircraft door. You transfer to an aisle chair, and ground crew loads your wheelchair into the cargo compartment via a belt loader or lift. On arrival, the chair is typically returned to the jet bridge, not the baggage carousel, reducing handling points and keeping it out of the automated baggage system where much damage occurs.
The Cargo Hold Reality
Checking your chair at the ticket counter means it enters the standard baggage handling system, traveling on conveyor belts and potentially stacked with other luggage. For a power wheelchair with delicate electronics, this is high-risk. The only advantage is not navigating the airport with your chair, but for most travelers the increased risk is not worth that convenience.
When You Don't Have a Choice
Some power wheelchairs, particularly those with non-removable lithium-ion batteries exceeding airline watt-hour limits, must be checked at the counter. If that's your situation, before you surrender the chair:
- Remove every possible component. Take off the seat cushion, armrests, footrests, and any detachable electronics. Carry these with you in the cabin.
- Disconnect and insulate the battery. If the battery is removable, take it out and carry it in a fire-resistant bag in the cabin. If it's not removable, ensure the terminals are taped and the chair is powered off completely.
- Request a "This Side Up" and "Fragile" sticker from the check-in agent. While not a guarantee of careful handling, it signals to ground crew that the item requires special attention.
- Ask for a wheelchair-specific handling tag. Many airlines have a special tag for mobility devices that indicates it's an assistive device, not standard luggage. This tag can trigger different handling procedures.
The Decision Framework
Use this checklist to decide your approach:
- Can you physically transfer to an aisle chair at the gate? If yes, gate check is your best option.
- Does your chair have a removable battery that meets cabin carry-on rules? If yes, gate check is viable.
- Is your chair a folding manual model? Gate check is strongly preferred, as it can often be placed in the cabin closet on smaller regional jets if you ask at the gate.
- Is your chair a large power model with a non-removable battery? You may be required to check it at the counter. If so, follow the enhanced protection steps above.
The Unique Angle: Requesting a Cabin Stowage Exception
Under the ACAA, airlines must accommodate assistive devices in the cabin if they can be stowed safely. For folding manual wheelchairs, ask the gate agent directly: "Can my folded wheelchair be stored in the cabin closet?" If the flight is not full, many agents will accommodate you, this is the single most effective way to protect your chair. If the agent says no, ask to speak with the gate supervisor or captain directly.
If you must use the cargo hold, the protective measures you take before handoff, documentation, disassembly, and padding, become your primary defense.
Step 6: Document Everything Before Handoff
Visual documentation is your strongest evidence if you need to file a damage claim, but a few quick photos are not enough. Here is a systematic protocol that will hold up under scrutiny from airline claims departments and insurance adjusters.
The Pre-Flight Documentation Protocol
1. Create a Baseline Video
Before you disassemble anything, take a continuous, slow video walkaround of your chair. Start at the front, move clockwise, and narrate as you go. Say the date, your name, and the chair's condition out loud. Show the serial number plate, which is usually located on the frame near the rear axle or under the seat. This video establishes the chair's overall condition and proves it was operational before the flight.
2. Photograph Every Component Systematically
After the video, take still photos in this order:
- Full Chair Views: Front, back, left side, right side, and a 45-degree angle from each corner. This gives you a complete 360-degree view.
- Serial Number Close-Up: A clear, readable photo of the serial number plate. This is essential for insurance claims and for identifying the exact model if a replacement is needed.
- Sensitive Components: Close-ups of the joystick, controller box, all wiring connections, wheel locks, anti-tippers, and any electronic displays. Show that these are intact and undamaged.
- Pre-Existing Damage: If your chair has scratches, dents, or worn parts, photograph them specifically. Zoom in and use a coin or ruler for scale. This prevents the airline from blaming you for damage they caused.
- Battery Connections: Before you disconnect anything, photograph the battery terminals and wiring layout. This is critical for reassembly and for proving the battery was properly connected.
3. The Handoff Documentation
When you hand your chair to an airline employee, do not just walk away. Follow this process:
- Request a Condition Report: Ask the gate agent or ramp agent to complete a "Condition of Equipment" form with you. Many airlines have this form, but they rarely offer it proactively. If they don't have one, ask them to write a note on your boarding pass or a piece of airline letterhead describing the chair's condition at handoff.
- Photograph the Handoff: Take a photo of the airline employee with your chair. This is not about being confrontational; it's about establishing a timestamp and a point of contact. If the employee refuses, note their name and badge number.
- Get a Receipt: If your chair is checked at the counter, you should receive a baggage claim tag for it. Keep this tag. It is your proof that the airline accepted the chair.
4. The Arrival Documentation
When you land, document the chair's condition before you touch it:
- Photograph the Chair as It Arrives: Take photos of the chair as it's brought to the jet bridge or baggage claim. Do not move or adjust the chair until you've documented its condition.
- Inspect Systematically: Walk around the chair and look for new damage. Check the joystick, wheels, frame joints, and any protruding parts. If you see damage, photograph it immediately with a scale reference.
- Report Damage On the Spot: If you find damage, do not leave the airport. Go directly to the airline's baggage service office and file a report. Use your pre-flight photos and videos to show the chair's condition before the flight. The airline is required to provide a written damage report, demand it and keep a copy.
Why This Protocol Works
This documentation gives you an irrefutable record of your chair's condition, essential for ACAA claims and supplemental insurance. It also signals to airline staff that you are a prepared, informed traveler, ground crew are far less likely to handle a chair carelessly when they know the owner has documented its condition. This protocol is about preventing damage by changing how airline staff treat your equipment.
Step 7: Know Your Airline Wheelchair Damage Compensation Rights
Airline wheelchair damage compensation is governed by the ACAA, which treats wheelchairs as assistive devices rather than ordinary baggage. This distinction matters because it removes the liability caps that apply to checked luggage. If the airline damages your wheelchair, it is responsible for the full cost of repair or replacement.
When damage occurs, the airline must arrange for repairs at its own facility or pay for repairs at a facility you choose. If the chair cannot be repaired, the airline must replace it with a comparable model. You are also entitled to a loaner wheelchair while yours is being repaired, so your mobility is not interrupted.
File your claim promptly and include your photographs, the damage report, and repair estimates. The DOT disability complaints process allows you to escalate to the department if the airline does not resolve your claim satisfactorily. Many travelers find that persistence and documentation are the two factors that most influence a fair outcome.
Every flight carries some risk for mobility equipment, but protecting wheelchair during air travel is largely a matter of preparation and knowledge. Remove what can be removed, pad what cannot, document your chair's condition, and know that the ACAA stands behind you if something goes wrong. At Journey Must Haves, our travel essentials are designed to help you face these challenges with confidence. Explore our collections and make your next trip one where you can focus on the destination, not the logistics.
Frequently Asked Questions
What is the best way to protect my wheelchair joystick during a flight?
Wrap the joystick controller in 2-3 layers of bubble wrap and secure it with rubber bands or tape. Then cover the entire controller with a padded pouch or a thick sock for extra cushioning. This prevents impact damage when ground handlers move the chair. For power wheelchairs, remove the joystick entirely if it detaches and carry it in your cabin bag whenever possible.
How do airlines handle wheelchairs at the gate?
Airlines use an aisle chair to get you to your seat, then tag your wheelchair for gate check. Your chair goes down a lift into the cargo hold and is returned to the jet bridge upon arrival. Tell the gate agent you want a gate check tag, not a cargo hold tag. Gate-checked chairs generally receive gentler handling and are less likely to get lost.
What are my rights if an airline damages my wheelchair?
Under the Air Carrier Access Act, airlines must pay for repairs or replacement of damaged wheelchairs. File a written report with the airline before leaving the airport, photograph the damage immediately, and keep your gate check tag. If they deny your claim, you can file a complaint with the U.S. Department of Transportation.
Should I remove my wheelchair cushion before boarding?
Yes, remove your cushion and bring it into the cabin with you. Your cushion is custom-fitted to your body and helps prevent pressure injuries. Airlines cannot count your cushion as a carry-on item. If you use a gel or foam cushion, place it in a large plastic bag before boarding to keep it clean.